I am learning Swift, the new programming language developed by Apple for iOS and OSX application development, and ArcGIS iOS SDK. I am planning to make a series of tutorials based on what I have learned progressively.
In this tutorial, I am going to show you how to use Singapore’s official map platform, OneMap (www.onemap.sg), in iOS 8 application.
OneMap is an integrated map system for government agencies to deliver location-based services and information. It is a multi-agency collaboration with many government agencies currently participating and contributing information. ~ http://www.onemap.sg/home
To use OneMap in our iOS app, we need to use ArcGIS iOS SDK from Esri. First download the ArcGIS SDK for iOS from https://developers.arcgis.com/ios/. Follow the guide to install and setup the development environment. ArcGIS has a very comprehensive guide for installing and setting up the development environment.
To use OneMap, first you need to add a UIView to your storyboard. In the Identity Inspector, change the UIView class name to AGCMapView.

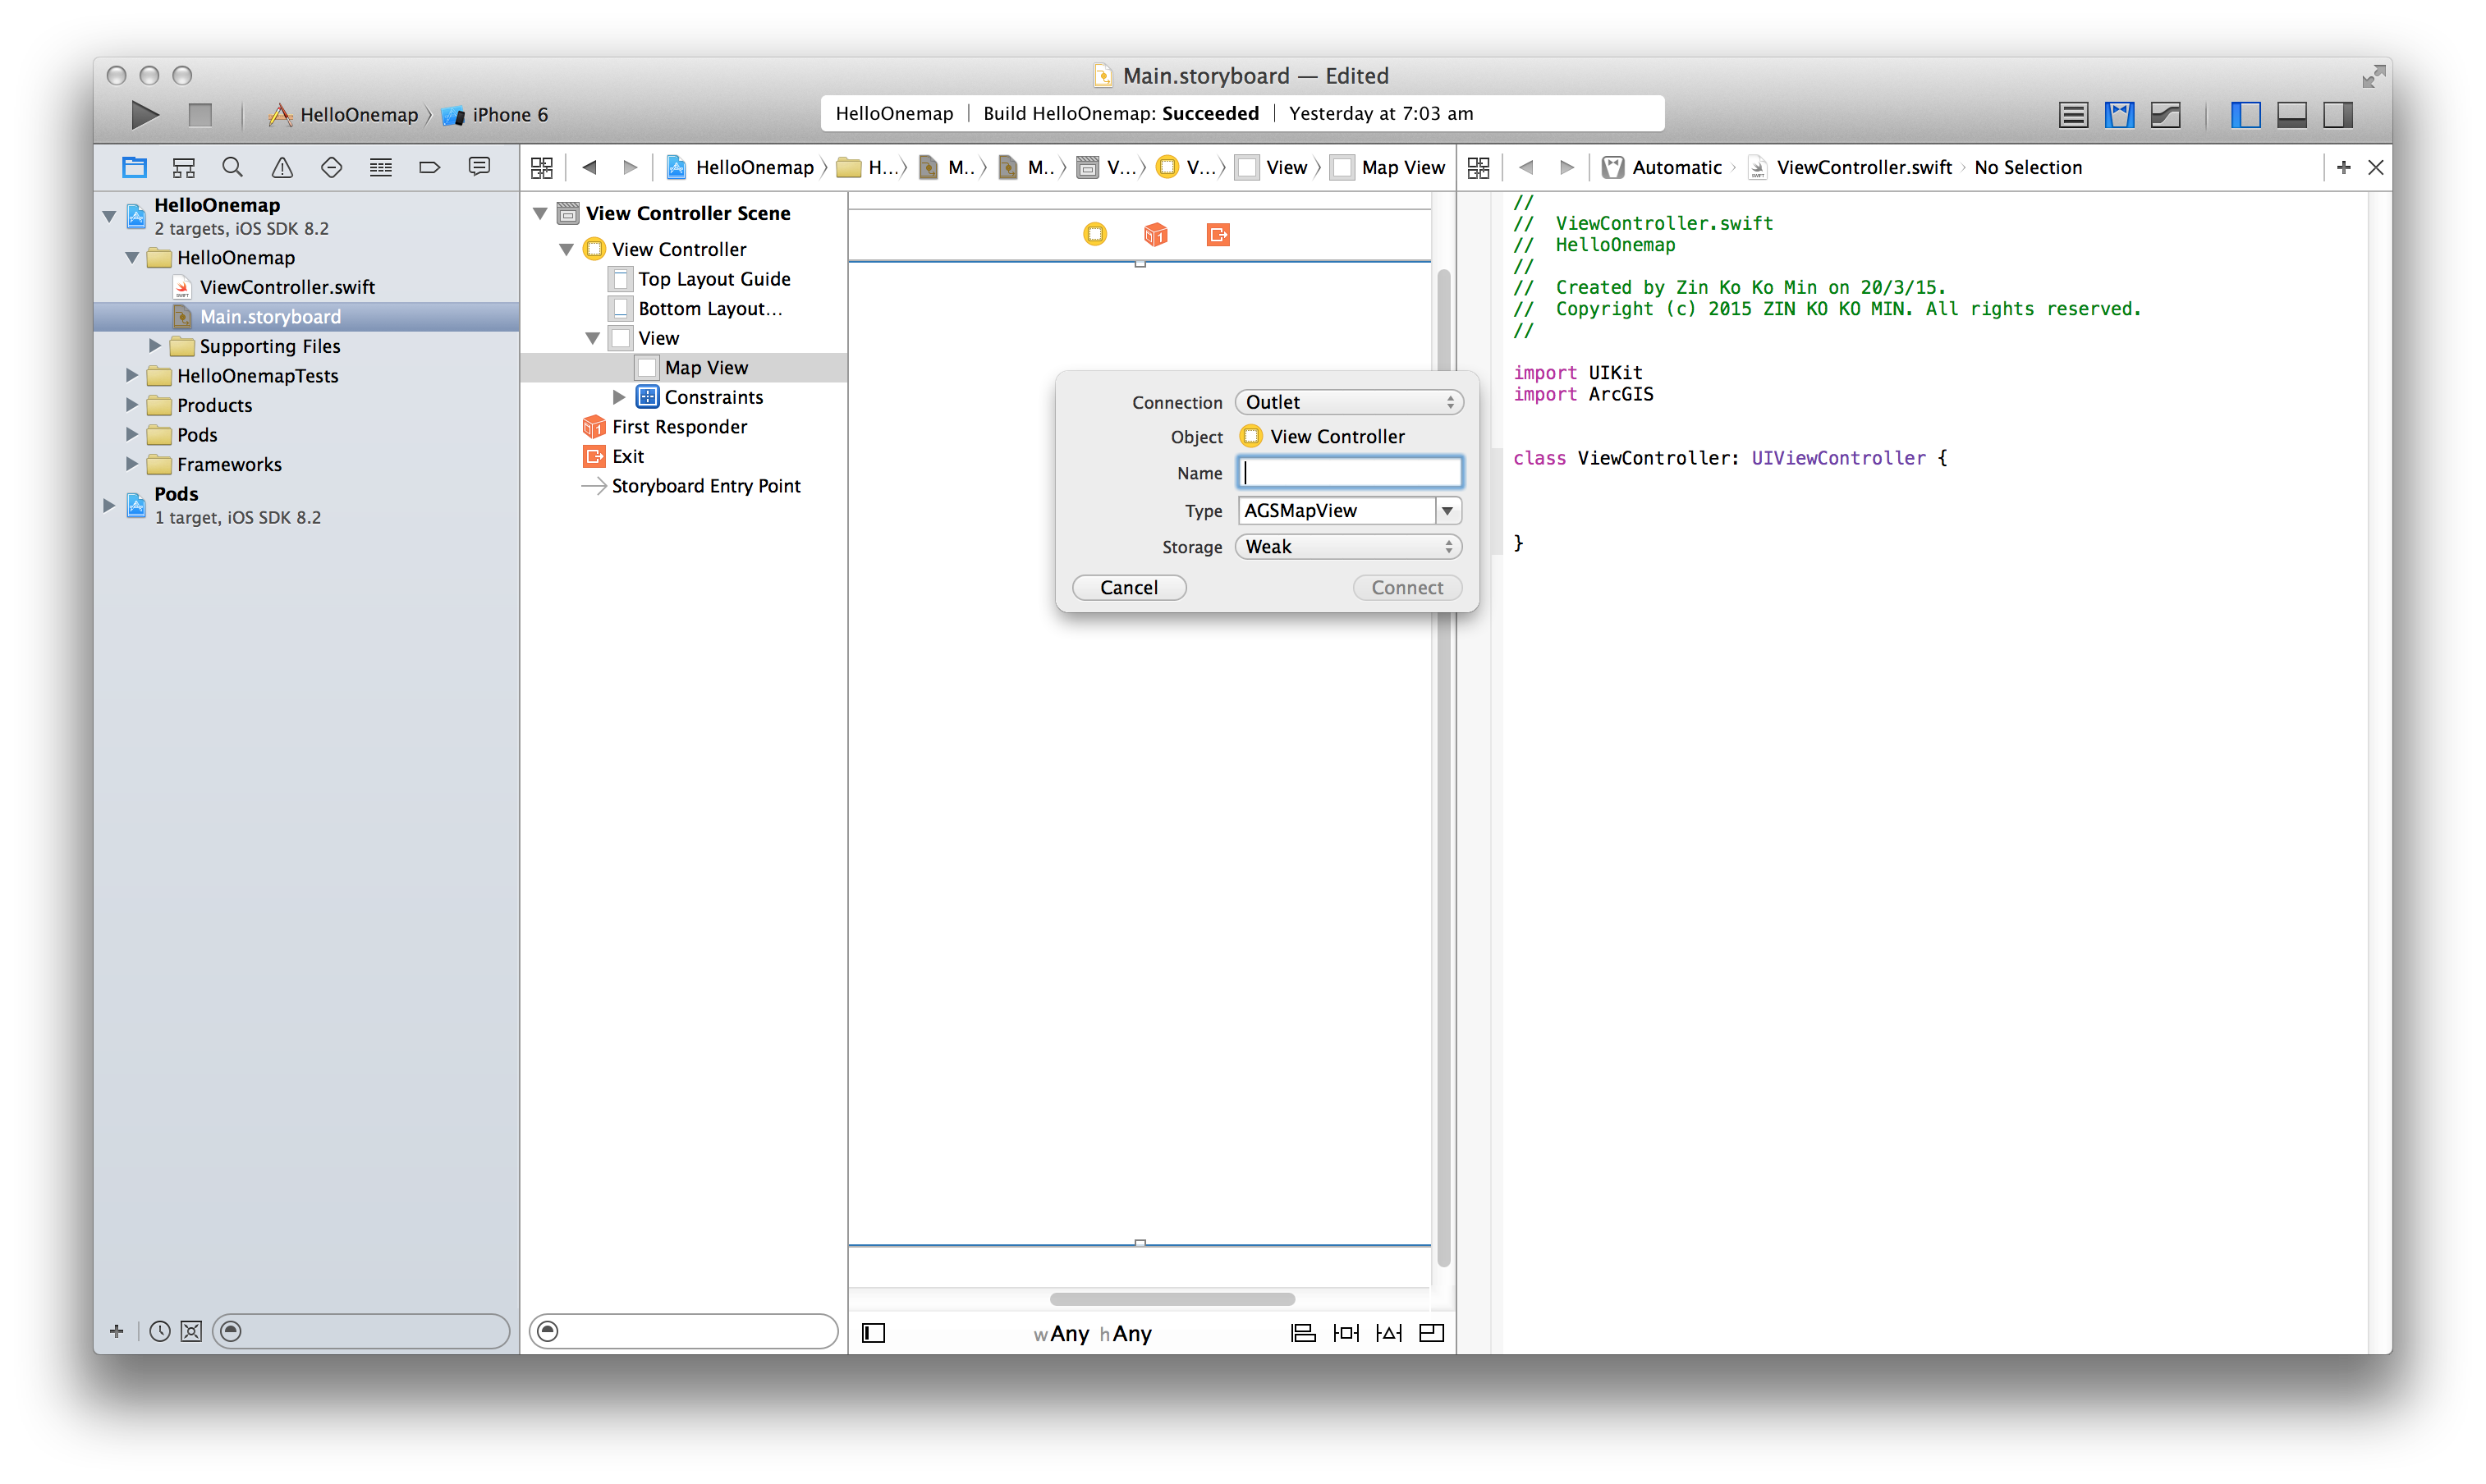
Connect the map view to the view controller by creating an outlet in in ViewController.swift file.
Import the ArcGIS framework in view controller’s swift file to use ArcGIS SDK for ios.
This file contains hidden or bidirectional Unicode text that may be interpreted or compiled differently than what appears below. To review, open the file in an editor that reveals hidden Unicode characters.
Learn more about bidirectional Unicode characters
| // import ArcGIS framework | |
| import UIKit | |
| import ArcGIS |
In the viewDidLoad method of ViewController.swift file, create a tiled map layer using OneMap map service and add it to the map:
This file contains hidden or bidirectional Unicode text that may be interpreted or compiled differently than what appears below. To review, open the file in an editor that reveals hidden Unicode characters.
Learn more about bidirectional Unicode characters
| override func viewDidLoad() { | |
| super.viewDidLoad() | |
| // set OneMap base map url | |
| let url = NSURL(string: "http://e1.onemap.sg/arcgis/rest/services/BASEMAP/MapServer") | |
| // create a tiled map layer | |
| let tiledLayer = AGSTiledMapServiceLayer(URL: url) | |
| // add layer to the mapView UIView | |
| self.mapView.addMapLayer(tiledLayer, withName: "Basemap Tiled Layer") | |
| } |
Run the application and you will see the map application displaying onemap.sg base map in the map view.

Right now, our map displays the whole Singapore, but we want it to be focus on a particular area in Singapore when it is loaded. To do this we need to define the initial map extent to zoom in display. We need to pass the envelope geometry to the zoomToEnvelope:animated: method to zoom to the area we are interested in.
An envelope is defined by a pair of X-Y coordinates representing the lower-left and upper-right corners of a rectangular bounding-box.
To create an envelope geometry, we need X min, Y min, X max and Y max. How do we find out this values? Pretty easy. We can get the current map’s extent from mapView.visibleAreaEnvelope property. So we just have to zoom in to the area of interest and inspect the current mapView.visibleAreaEnvelope values and use them as the initial extent in viewDidLoad method.
Our View Controller must adapt to the AGSMapViewLayerDelegate protocol and set itself as the delegate of mapView‘s layerDelegate.
This file contains hidden or bidirectional Unicode text that may be interpreted or compiled differently than what appears below. To review, open the file in an editor that reveals hidden Unicode characters.
Learn more about bidirectional Unicode characters
| class ViewController: UIViewController, AGSMapViewLayerDelegate { |
In the viewDidLoad method, add this line to set delegate. See the API reference documentation for the AGSMapViewLayerDelegate protocol to learn more on layerDelegate.
This file contains hidden or bidirectional Unicode text that may be interpreted or compiled differently than what appears below. To review, open the file in an editor that reveals hidden Unicode characters.
Learn more about bidirectional Unicode characters
| self.mapView.layerDelegate = self |
Then implement mapViewDidLoad delegate method to add observer for mapView pan and zoom notifications.
This file contains hidden or bidirectional Unicode text that may be interpreted or compiled differently than what appears below. To review, open the file in an editor that reveals hidden Unicode characters.
Learn more about bidirectional Unicode characters
| func mapViewDidLoad(mapView:AGSMapView!){ | |
| NSNotificationCenter.defaultCenter().addObserver(self, selector: "responseToEventChanged:", name: AGSMapViewDidEndZoomingNotification, object: nil) | |
| } | |
| func responseToEventChanged(notification: NSNotification){ | |
| let theString = "xmin = \(mapView.visibleAreaEnvelope.xmin),\nymin = \(mapView.visibleAreaEnvelope.ymin),\nxmax = \(mapView.visibleAreaEnvelope.xmax),\nymax = \(mapView.visibleAreaEnvelope.ymax)" | |
| println(theString); | |
| } |
Run the application and zoom to the area you want to show on initial start up. As you zoom in to the area, you can see then envelope geometry data printed out in Xcode console. When you are satisfied with the view, copy the X min, Y min, X max and Y max from the console and use them as initial extent.
I choose Nanyang Polytechnic as my starting view and create an envelop geometry from it. Following is the complete code:
This file contains hidden or bidirectional Unicode text that may be interpreted or compiled differently than what appears below. To review, open the file in an editor that reveals hidden Unicode characters.
Learn more about bidirectional Unicode characters
| import UIKit | |
| import ArcGIS | |
| class ViewController: UIViewController, AGSMapViewLayerDelegate { | |
| @IBOutlet weak var mapView: AGSMapView! | |
| let xmin = 29495.9472786567 | |
| let ymin = 39801.9418330241 | |
| let xmax = 30037.5707551916 | |
| let ymax = 40765.3094566208 | |
| override func viewDidLoad() { | |
| super.viewDidLoad() | |
| // add base map | |
| let url = NSURL(string: "http://e1.onemap.sg/arcgis/rest/services/BASEMAP/MapServer") | |
| let tiledLayer = AGSTiledMapServiceLayer(URL: url) | |
| self.mapView.addMapLayer(tiledLayer, withName: "Basemap Tiled Layer") | |
| self.mapView.layerDelegate = self | |
| let envelope = AGSEnvelope(xmin: xmin, ymin: ymin, xmax: xmax, ymax: ymax, spatialReference: self.mapView.spatialReference); | |
| self.mapView.zoomToEnvelope(envelope, animated: false) | |
| } | |
| func mapViewDidLoad(mapView:AGSMapView!){ | |
| NSNotificationCenter.defaultCenter().addObserver(self, selector: "responseToEventChanged:", name: AGSMapViewDidEndZoomingNotification, object: nil) | |
| } | |
| func responseToEventChanged(notification: NSNotification){ | |
| let theString = "xmin = \(mapView.visibleAreaEnvelope.xmin),\nymin = \(mapView.visibleAreaEnvelope.ymin),\nxmax = \(mapView.visibleAreaEnvelope.xmax),\nymax = \(mapView.visibleAreaEnvelope.ymax)" | |
| println(theString); | |
| } | |
| } |

In this tutorial, we have learned how to add OneMap as based map to the iOS application and setting up initial map extent to the location of interest by using envelop geometry. If you want to know more about OneMap features and services, please visit to their API help page http://www.onemap.sg/api/help/.
Look forward for more tutorials on using OneMap from me and please leave a comment if you find any error or have difficulty following the steps above.

One thought on “Using OneMap in iOS map application”