For someone with godlike power, he sure is not that bright. He could have eliminated his arch enemies easily without harming him from far. He could have ruled the earth as a benevolent dictator. Instead, he is permanently handicapped by his unrealistic moral constraints, failing to take action, letting the bad guys grow stronger. I was never a fan of his.
That was what I used to think.
But as I get older and older, I am starting to realize his true power and strength. His true power is his sense of justice and his strength, his self-control.
Can you imagine a Being, as powerful as him, and who could get away with anything if he wishes – preserving the justice risking his life? I can’t.
This project took me really long to finish. I spent so much time trying to write a comprehensive blog post on explaining the project. But I realized my goal is to create 100 projects in using Angular framework, not to produce 100 how-to tutorials on Angular.
So this post is rather an update on what I’ve done than a guide post.
In this project, I’ve created a website with a dashboard which is password protected. JWT authentication is implemented using a backend created in Django and hosted in my c9.io instance.
In this project, I’ve created the following:
A password protected dashboard component
An authentication service to post request to backend API
A login component
An http interceptor to include JWT token in the http request
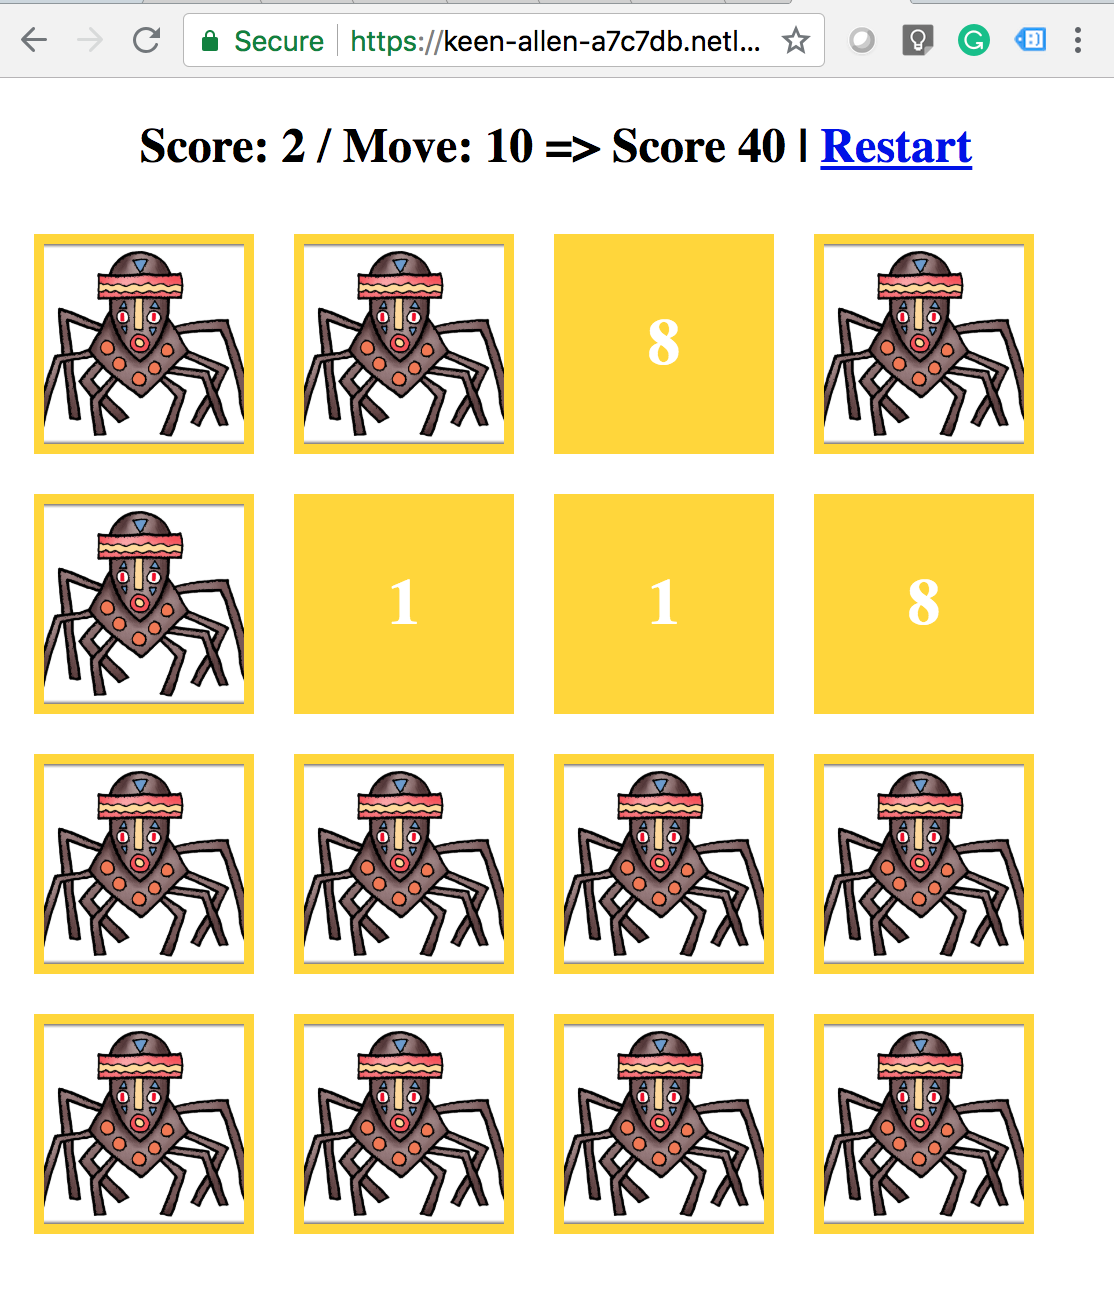
This project has taken more then what I’ve intended. In this project, I am creating a memory game called concentration. There are several versions of concentration game. But I’ve implemented the simplest one.
The Game
There 2 pairs of cards with number 1 to 8.
The cards are laid face down.
Each turn, the player click a pair of cards to flip.
If the pair matches, the player score points.
If the pair is not matched, the pair of cards turns back to face down.
It is a pretty simple project. But it had taken me more time than I should have because I have overcomplicated the overall game design.
Following are the steps I’ve taken to develop the game.
Design game engine
Card object
cardNumber
A string value which will be used to compare between two cards for similarity
image
A URL to image resource of the card
isFaceup
To keep track of the current state of the card
done
To keep track of whether the card is already matched
Deck object
cards
An array of card objects
shuffle( )
Shuffle cards
flipDown()
To put all the cards in the deck face down
Game object
score
current score of the player
move
total number of moves made by player
match
total number of matched pairs
deck
a deck to play
deal( )
call shuffle of the deck
checkScore( )
compare two cards which are facing up for similarity
Provide game functions in service
Create a service called game. Inside the game.service.ts file define two functions as follow:
createDeck(count: number)
Create and return a deck of card with the provided number of cards
getGame(deck: Deck)
Create and return a game object using the provided deck
Components
CardComponent
Uses card object as the data model
Implements flipping on click event
GameBoardComponent
Uses a list of CardComponents to create the game board to play
Design game board page
Create simple and ugly page to stop myself from wasting too much time fiddling with CSS and colors
This project has two components; the main page and audio track player page. On the home page, four images of famous Burmese Monks are shown in card style. When the user clicked on a card, they are brought to a player with the dhamma talks of the selected monk.
Basically, I am trying to learn how to use the Angular router for navigation between different components in a single page application.
Everything went well, except for one thing. I have been spending way too much time messing around with CSS and colors instead of focusing on functionality.
So, from now on I will spend less time on design aspect and more on functional aspects for future projects.
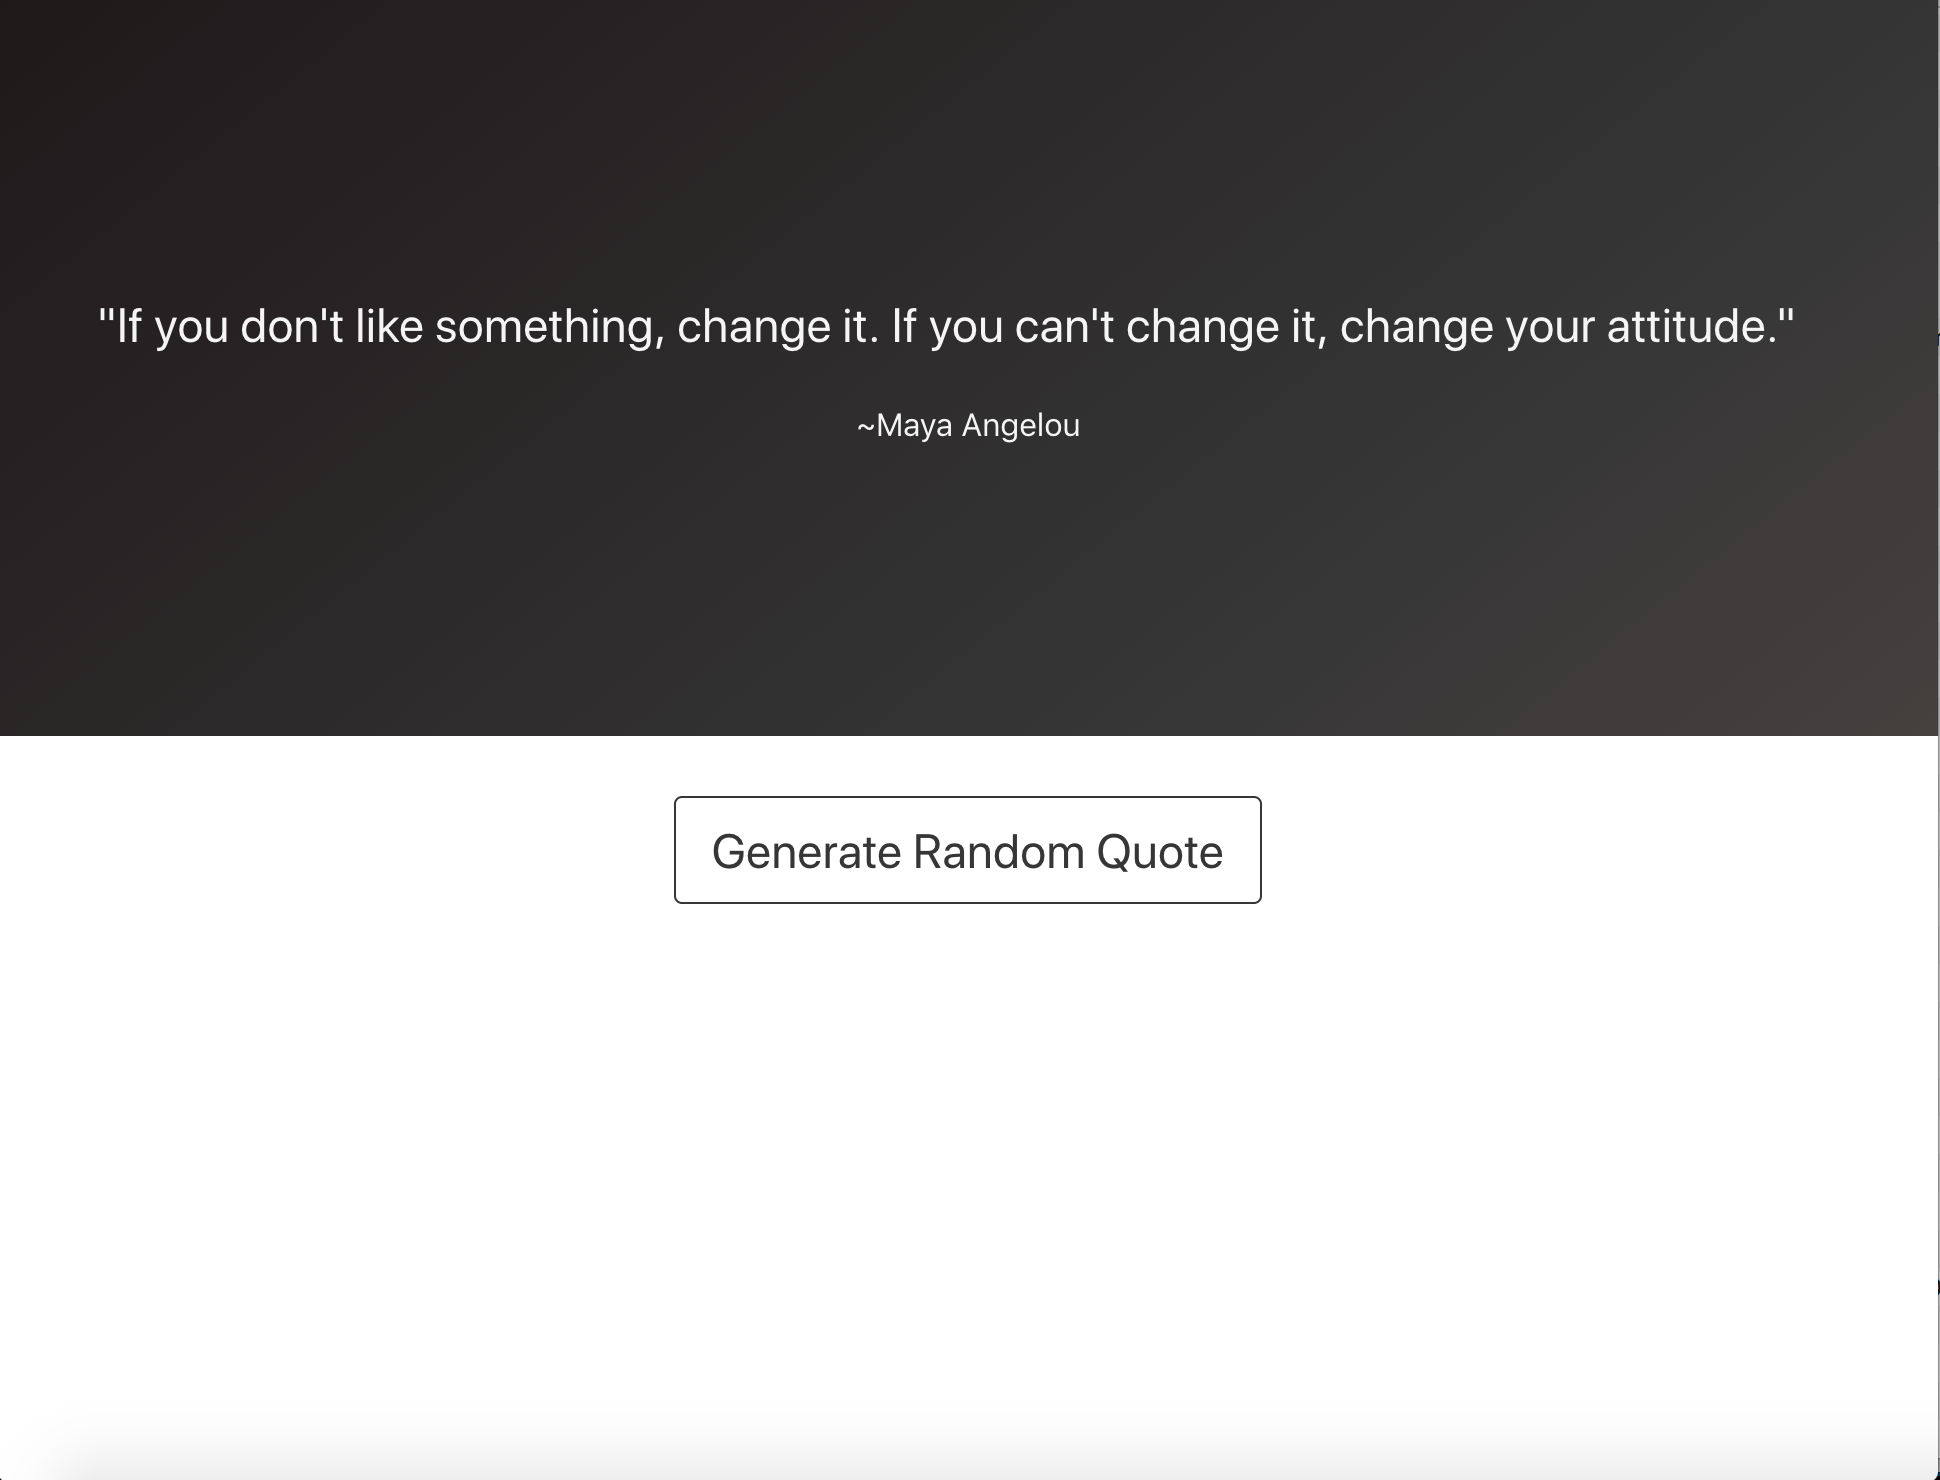
In this project, I created a web page which fetches a random quote from an API endpoint and displays it on the page.
I have learned a few new concepts while creating this simple web application, such as
using services to separate fetching data from components
using observable and Angular HttpClient for fetching data asynchronously and providing a way for the data to be consumed from a component
calling child component’s function from parent component using @ViewChild
Service, Observable and HttpClient for asynchronous API call
This file contains hidden or bidirectional Unicode text that may be interpreted or compiled differently than what appears below. To review, open the file in an editor that reveals hidden Unicode characters. Learn more about bidirectional Unicode characters
Using service to get a random quote from a component
This file contains hidden or bidirectional Unicode text that may be interpreted or compiled differently than what appears below. To review, open the file in an editor that reveals hidden Unicode characters. Learn more about bidirectional Unicode characters
Calling child component’s function from the parent component
This file contains hidden or bidirectional Unicode text that may be interpreted or compiled differently than what appears below. To review, open the file in an editor that reveals hidden Unicode characters. Learn more about bidirectional Unicode characters
This is the second post from the series of 100 angular projects I am doing. You can check out the first post here.
Based on the previous hello world project, I decided to have a little fun by adding CSS framework Bulma which is the new cool kid on the block. Watch out Bootstrap!
First I added the Bulma in the project using npm install:
npminstall --save bulma
Second I imported the Bulma in src\styles.css:
@import "~bulma/css/bulma.css"
Now Bulma styles are available globally. Afterward, I created two components for header and footer.
ng generate component components/header
ng g component components/footer  ## g is shorthand for generate
This will create header and footer components in src/app/components folder.
Edit the header.component.html, footer.component.html, and app.component.html for the Bulma hero layout look.
Let’s create a header with only a brand logo.
This file contains hidden or bidirectional Unicode text that may be interpreted or compiled differently than what appears below. To review, open the file in an editor that reveals hidden Unicode characters. Learn more about bidirectional Unicode characters
Finally, add those components into the main app.component.html.
This file contains hidden or bidirectional Unicode text that may be interpreted or compiled differently than what appears below. To review, open the file in an editor that reveals hidden Unicode characters. Learn more about bidirectional Unicode characters
Oftentimes we need to call a third party API in our web application. The recommended way would be using a task runner and task queue like Celery and RabbitMQ.
But sometimes, in a small project it is overkill to use Celery. Especially for a small traffic web site. On the other hand, I don’t want to call external API directly because it will block the request and user may have to wait, and that is never a good thing, small traffic or not.
So I decided to use different thread to call API. And it worked for my purpose.
This file contains hidden or bidirectional Unicode text that may be interpreted or compiled differently than what appears below. To review, open the file in an editor that reveals hidden Unicode characters. Learn more about bidirectional Unicode characters
Everything was fine until I write the unit tests. When I run the tests, an error was thrown at at the end, saying the test database cannot be dropped because there was another user using it.
Usually Django will automatically close the database connections when they exceeds maximum age defined or are not usable any longer.
There was a database access using Django model object in the new thread. After a quick search on google, I found out that the database connection were not closed even after the threads execution finished. The connections need to be manually closed.
This file contains hidden or bidirectional Unicode text that may be interpreted or compiled differently than what appears below. To review, open the file in an editor that reveals hidden Unicode characters. Learn more about bidirectional Unicode characters
I had posted how to add OneMap into your iOS application in previous post. In this tutorial we will try one of the OneMap REST APIs in Swift Playgrounds and see the return results. Xcode Playgrounds is perfect for experimenting with new APIs interactively. We are going to use Address Search API from OneMap.
This allows searching of address data for a given search value. This also allows support of commands such as AND, OR, including word (+), excluding word (-), and exact phrase search using quotation marks. It will return search results with X,Y coordinates of the searched location. http://www.onemap.sg/api/help/
First create a new Playgrounds file in xcode. Then import XCPlayground module. After that call XCPSetExecutionShouldContinueIndefinitely and set it true so that execution will continue and we can see the return result from asynchronous REST API calls.
This file contains hidden or bidirectional Unicode text that may be interpreted or compiled differently than what appears below. To review, open the file in an editor that reveals hidden Unicode characters. Learn more about bidirectional Unicode characters
Next, we are going to use NSURLSession to make the REST API call to OneMap service. I use the example URL available in their api help page.
This file contains hidden or bidirectional Unicode text that may be interpreted or compiled differently than what appears below. To review, open the file in an editor that reveals hidden Unicode characters. Learn more about bidirectional Unicode characters
After that we pass the url string to dataTaskWithURL function of the session object and implement a completion handler function to tackle the return result from async call.
This file contains hidden or bidirectional Unicode text that may be interpreted or compiled differently than what appears below. To review, open the file in an editor that reveals hidden Unicode characters. Learn more about bidirectional Unicode characters
var jsonResult = NSJSONSerialization.JSONObjectWithData(taskData, options: NSJSONReadingOptions.MutableContainers, error: &jsonReadError) as NSDictionary
We can convert the result JSON data using NSJSONSerialization.JSONObjectWithData method and cast it as NSDationary. And then we can write println statement on the elements of NSDationary result. The values of the result will be shown interactively at the right column of Playground. We can change the parameter values in the url string and see the result changes interactively.
We will use this API call in the next post, adding OneMap Search Function in iOS App.


